
Nothing is more frustrating than a slow website.
A slow website is bad not only for the end-user, but also for search engine optimization (SEO). Meaning, it can cause your website to rank lower in search engine results. That translates to fewer page views and less ad revenue or customer conversion for you.
Below I share nine ways you can make your website load faster. While this article shares some general tips, it also includes some for WordPress sites only. Throughout the article, I indicate clearly which tips are for WP users, and which can be for everyone.
Disclosure: I’m a proud affiliate for some of the resources mentioned in this article. If you buy a product through my links on this page, I may get a small commission for referring you. Thanks!
To make it easier to move around the article, here is a table of contents:
Why your website’s speed matters
How to check your website’s speed
9 ways to make your website load faster
- Improve your hosting plan
- Understand HTTP requests
- Make images internet-friendly
- Use plugins sparingly (WP sites only)
- Cut down on external scripts
- Optimize JS and CSS files
- Take advantage of caching
- Eliminate website baggage
- Use a content delivery network (CDN)
Why Your Website’s Speed Matters
The speed of your website matters for two reasons:
- Your user’s experience
- SEO
When it comes to user experience, Google’s research experiments show that faster site speed leads to happier users, increased productivity, and more time users spend browsing.
Moreover, research by Kissmetrics showed that 40% of people will abandon a site if it takes longer than three seconds to load. 47% of users expect a page to load in two seconds or less.
Overall, the speed of your site has a greater impact on user satisfaction than extra “bells and whistles”. It doesn’t matter how great a site looks: if it loads too slowly, users will click away.
Regarding SEO, Google uses site speed as one of the many factors that determines rank (how high your page appears in search results).
To determine rankings, Google factors pagespeed on both desktop and mobile platforms. If your site’s speed isn’t up to par, you can suffer ranking penalties.
Bing also uses pagespeed as a factor.
The reason why site speed matters is that search engines want to point users to sites with the best overall experience and information. Users can’t access all the great info you have if your site is unbearably slow.
How to Check Your Website’s Speed
To tell whether your website is slow or not, use one of the many free tools out there designed to report just that. Here are several:
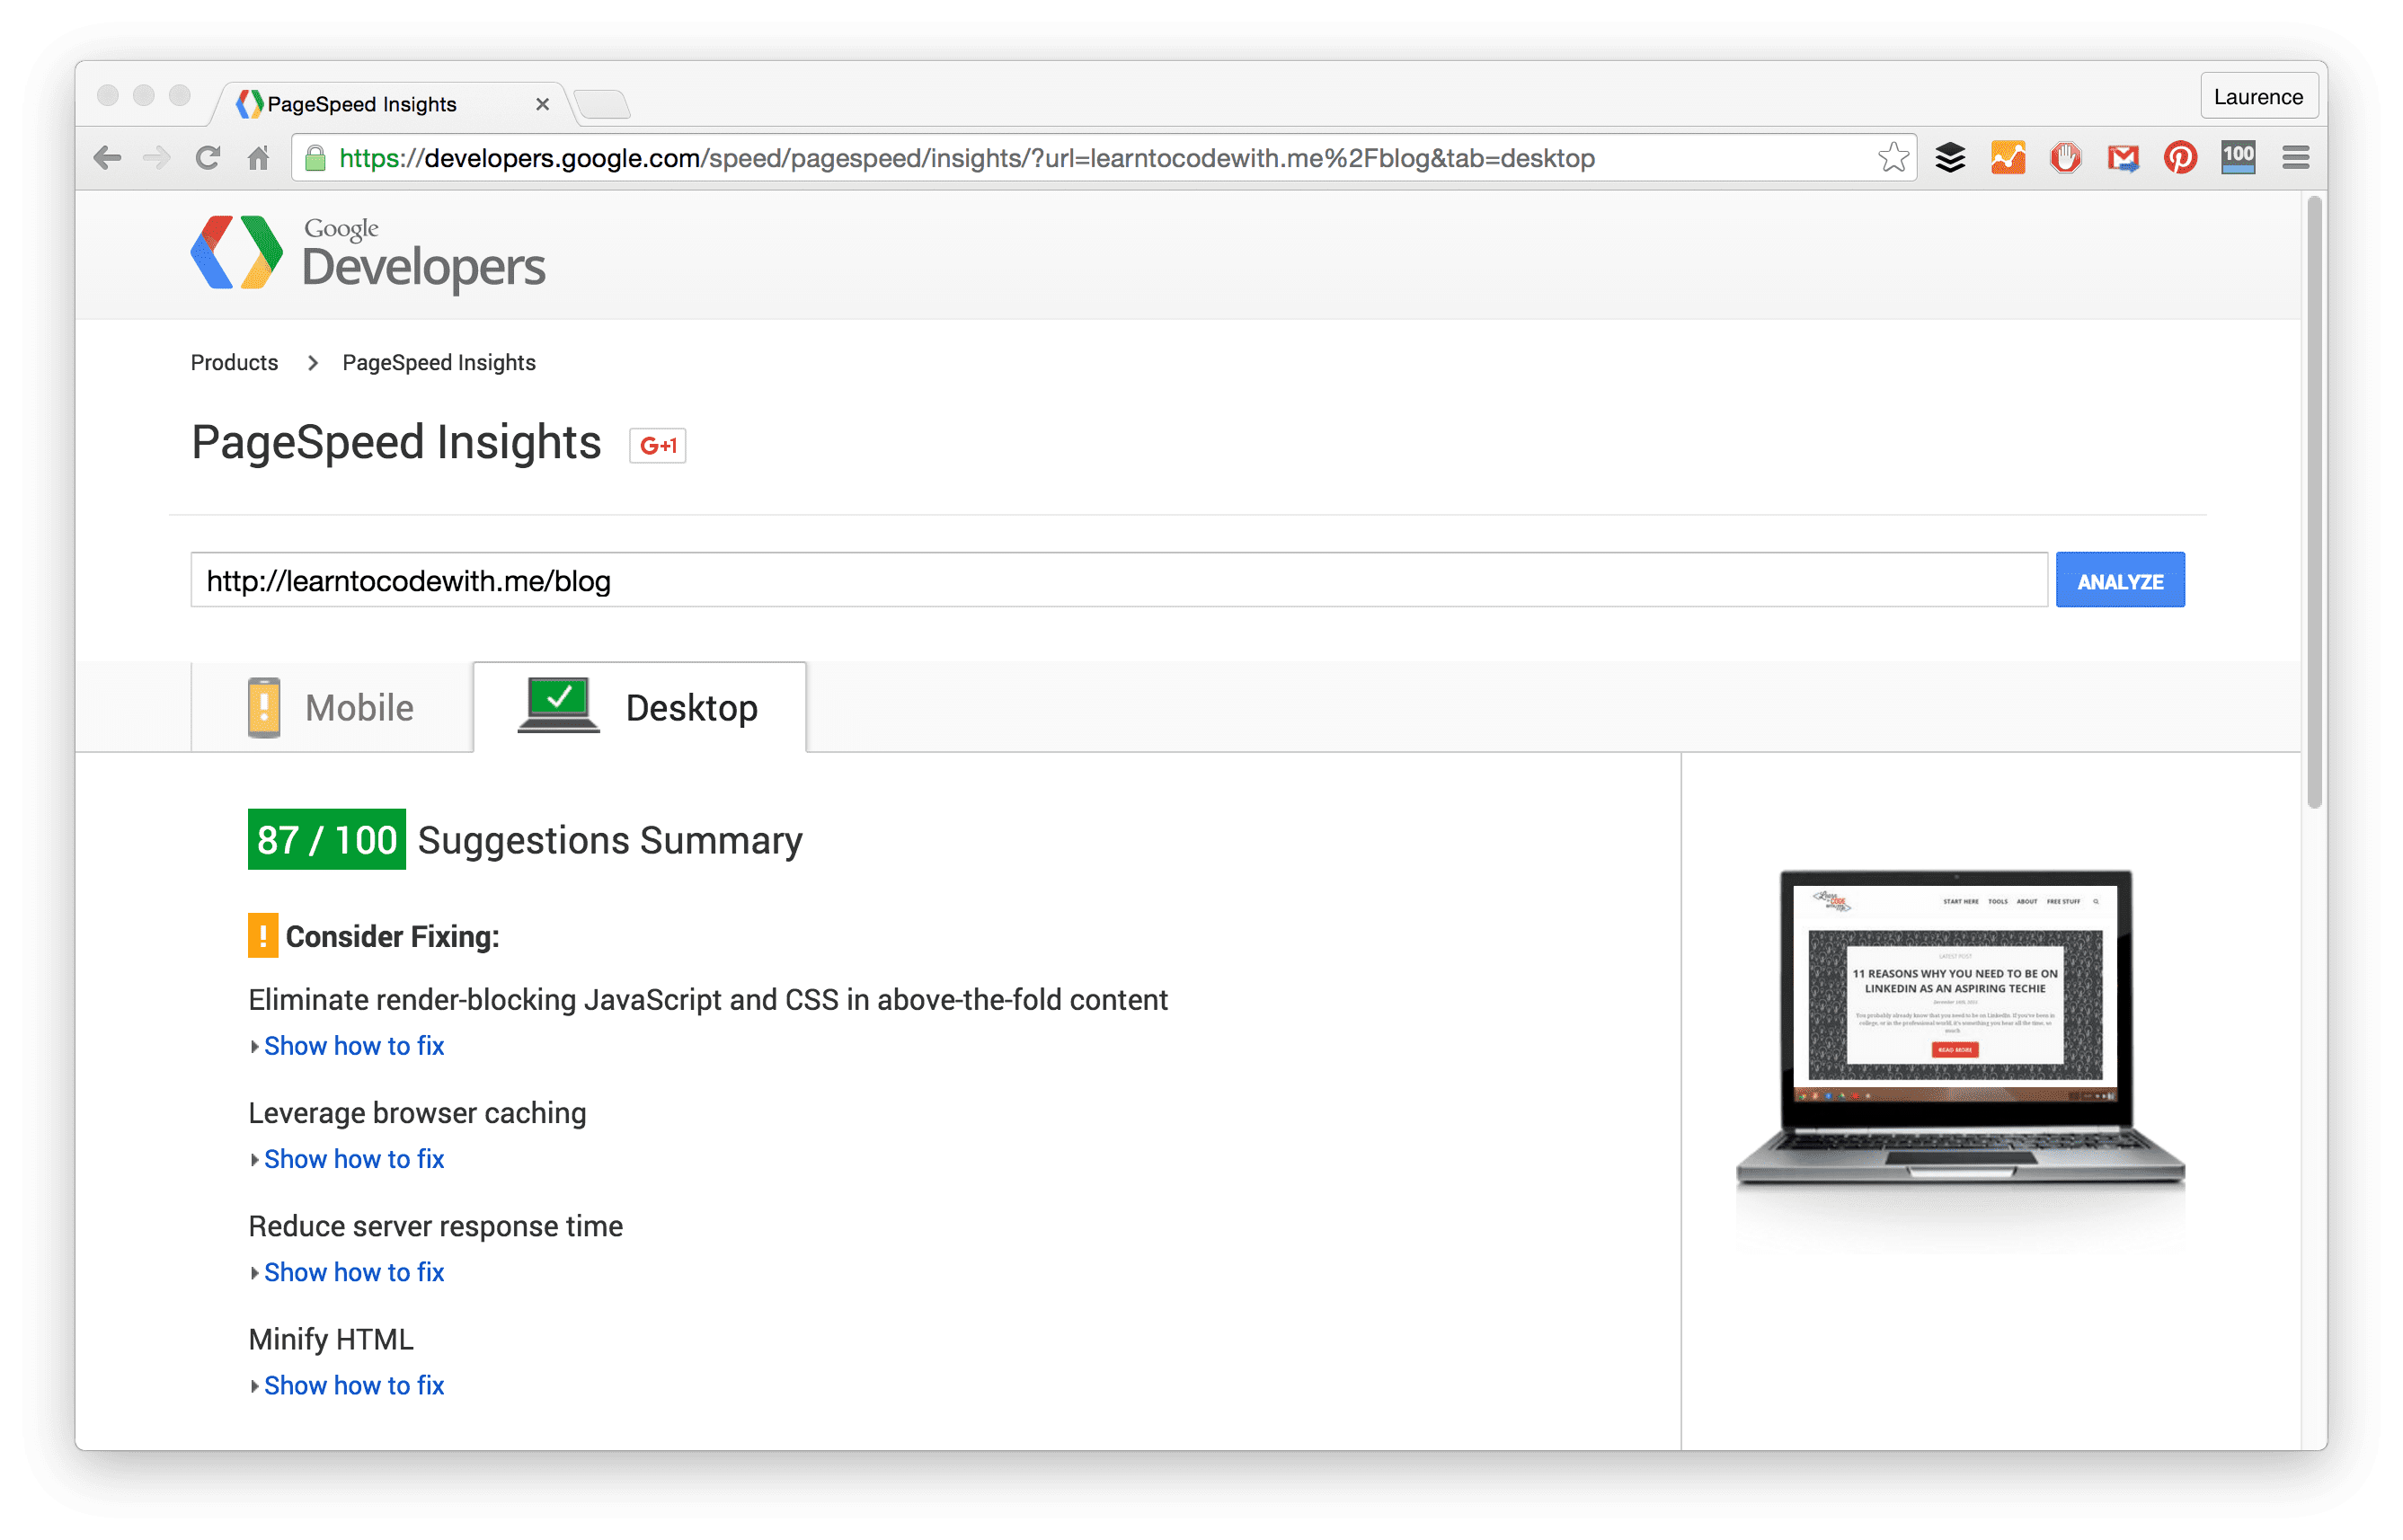
- Google’s PageSpeed Insights: Google’s very own tool. Gives mobile and desktop recommendations.
- Pingdom: Useful for all skill levels. Reviews site performance, grades it, and tracks performance history so you can see how your site speed has changed.
- GTmetrix: One of the most popular tools out there. GTmetrix analyzes how well your site loads, checking both PageSpeed and YSlow scores. It also gives suggestions on how to improve the load time.
- YSlow: Grades webpages on how they meet established high-performance guidelines. Also summarizes the different components of the website and allows you to view the analysis, offers advice on how to improve your site. YSlow offers a Chrome extension to test the speed of websites.
My personal favorite is Google’s PageSpeed Insights. It’s easy to use and the results are presented clearly. It also organizes suggestions by “should fix”, “consider fixing”, and “passed rules”.
I also like Pingdom, and will refer to it more later in the article.
Understand that results can vary from tool to tool. This is completely normal since they have differing metrics and are using different places in the world to test the site.
Now, let’s get on to some ways you can speed up your site and increase your website’s customer appeal.
9 Ways to Make Your Website Load Faster
1. Improve your hosting plan
Update (March 2020): Since writing this article, we changed our hosting to Kinsta and the site became so much faster, so we highly recommend it. Check out our detailed Kinsta review here.
This is one of the simplest ways you can speed up your website: looking at your server.
Often when we first start out, we go the cheap way and sign up for shared hosting. However, as sites grow in usage and content, they get slower. You can battle this by upgrading your hosting plan (moving to a VPS or dedicated option).
To illustrate, I used to be on Bluehost’s basic shared plan. A few months ago, I noticed my site was slowing down. I tried everything possible to make it faster, but nothing seemed to work. So, I decided to switch to Bluehost’s managed WordPress hosting plan.
After I upgraded from my basic shared plan, I noticed differences right away.
The reason it is so much faster is simple: you get dedicated resources. This means you don’t have to share bandwidth, RAM, CPU, etc. with anyone else. Also, the bandwidth limits are also much higher. Moreover, Bluehost has Varnish — which is an extremely optimized caching option that allows a larger number of visitors than shared hosting.
A quick note about VPS vs. dedicated hosting:
VPS hosting is probably the option you want to go with. It’s “in the cloud,” meaning it is distributed over multiple computers, sometimes even hundreds. It’s a scalable solution, and it’s a more affordable solution than dedicated hosting. Bloggers and medium/small businesses will find this option most appealing.
Dedicated servers are like you are renting out a big box. It’s essentially like owning own computer. The biggest upside to dedicated over VPS is that you have full control, because you have all the resources to yourself. However – it is usually much more expensive. And unlike a VPS, it’s less flexible, since you don’t have numerous computers.
Here are some useful resources to help you choose the right hosting option:
- Pros and cons of managed WordPress hosting
- The difference between VPS and dedicated options
- More info on the best WordPress hosting options
2. Understand HTTP requests
Sites are mainly slow because of too many (or too large) HTTP requests. When you understand HTTP requests, you can better eliminate them.
According to rve.org.uk,
“Whenever your web browser fetches a file (a page, a picture, etc) from a web server, it does so using HTTP – that’s “Hypertext Transfer Protocol”. HTTP is a request/response protocol, which means your computer sends a request for some file (e.g. “Get me the file ‘home.html'”), and the web server sends back a response (“Here’s the file”, followed by the file itself).”
There are many ways you can reduce or eliminate HTTP requests, which this article covers later.
However, to see how many HTTP requests a page on your site makes, you can run a speed test on Pingdom.
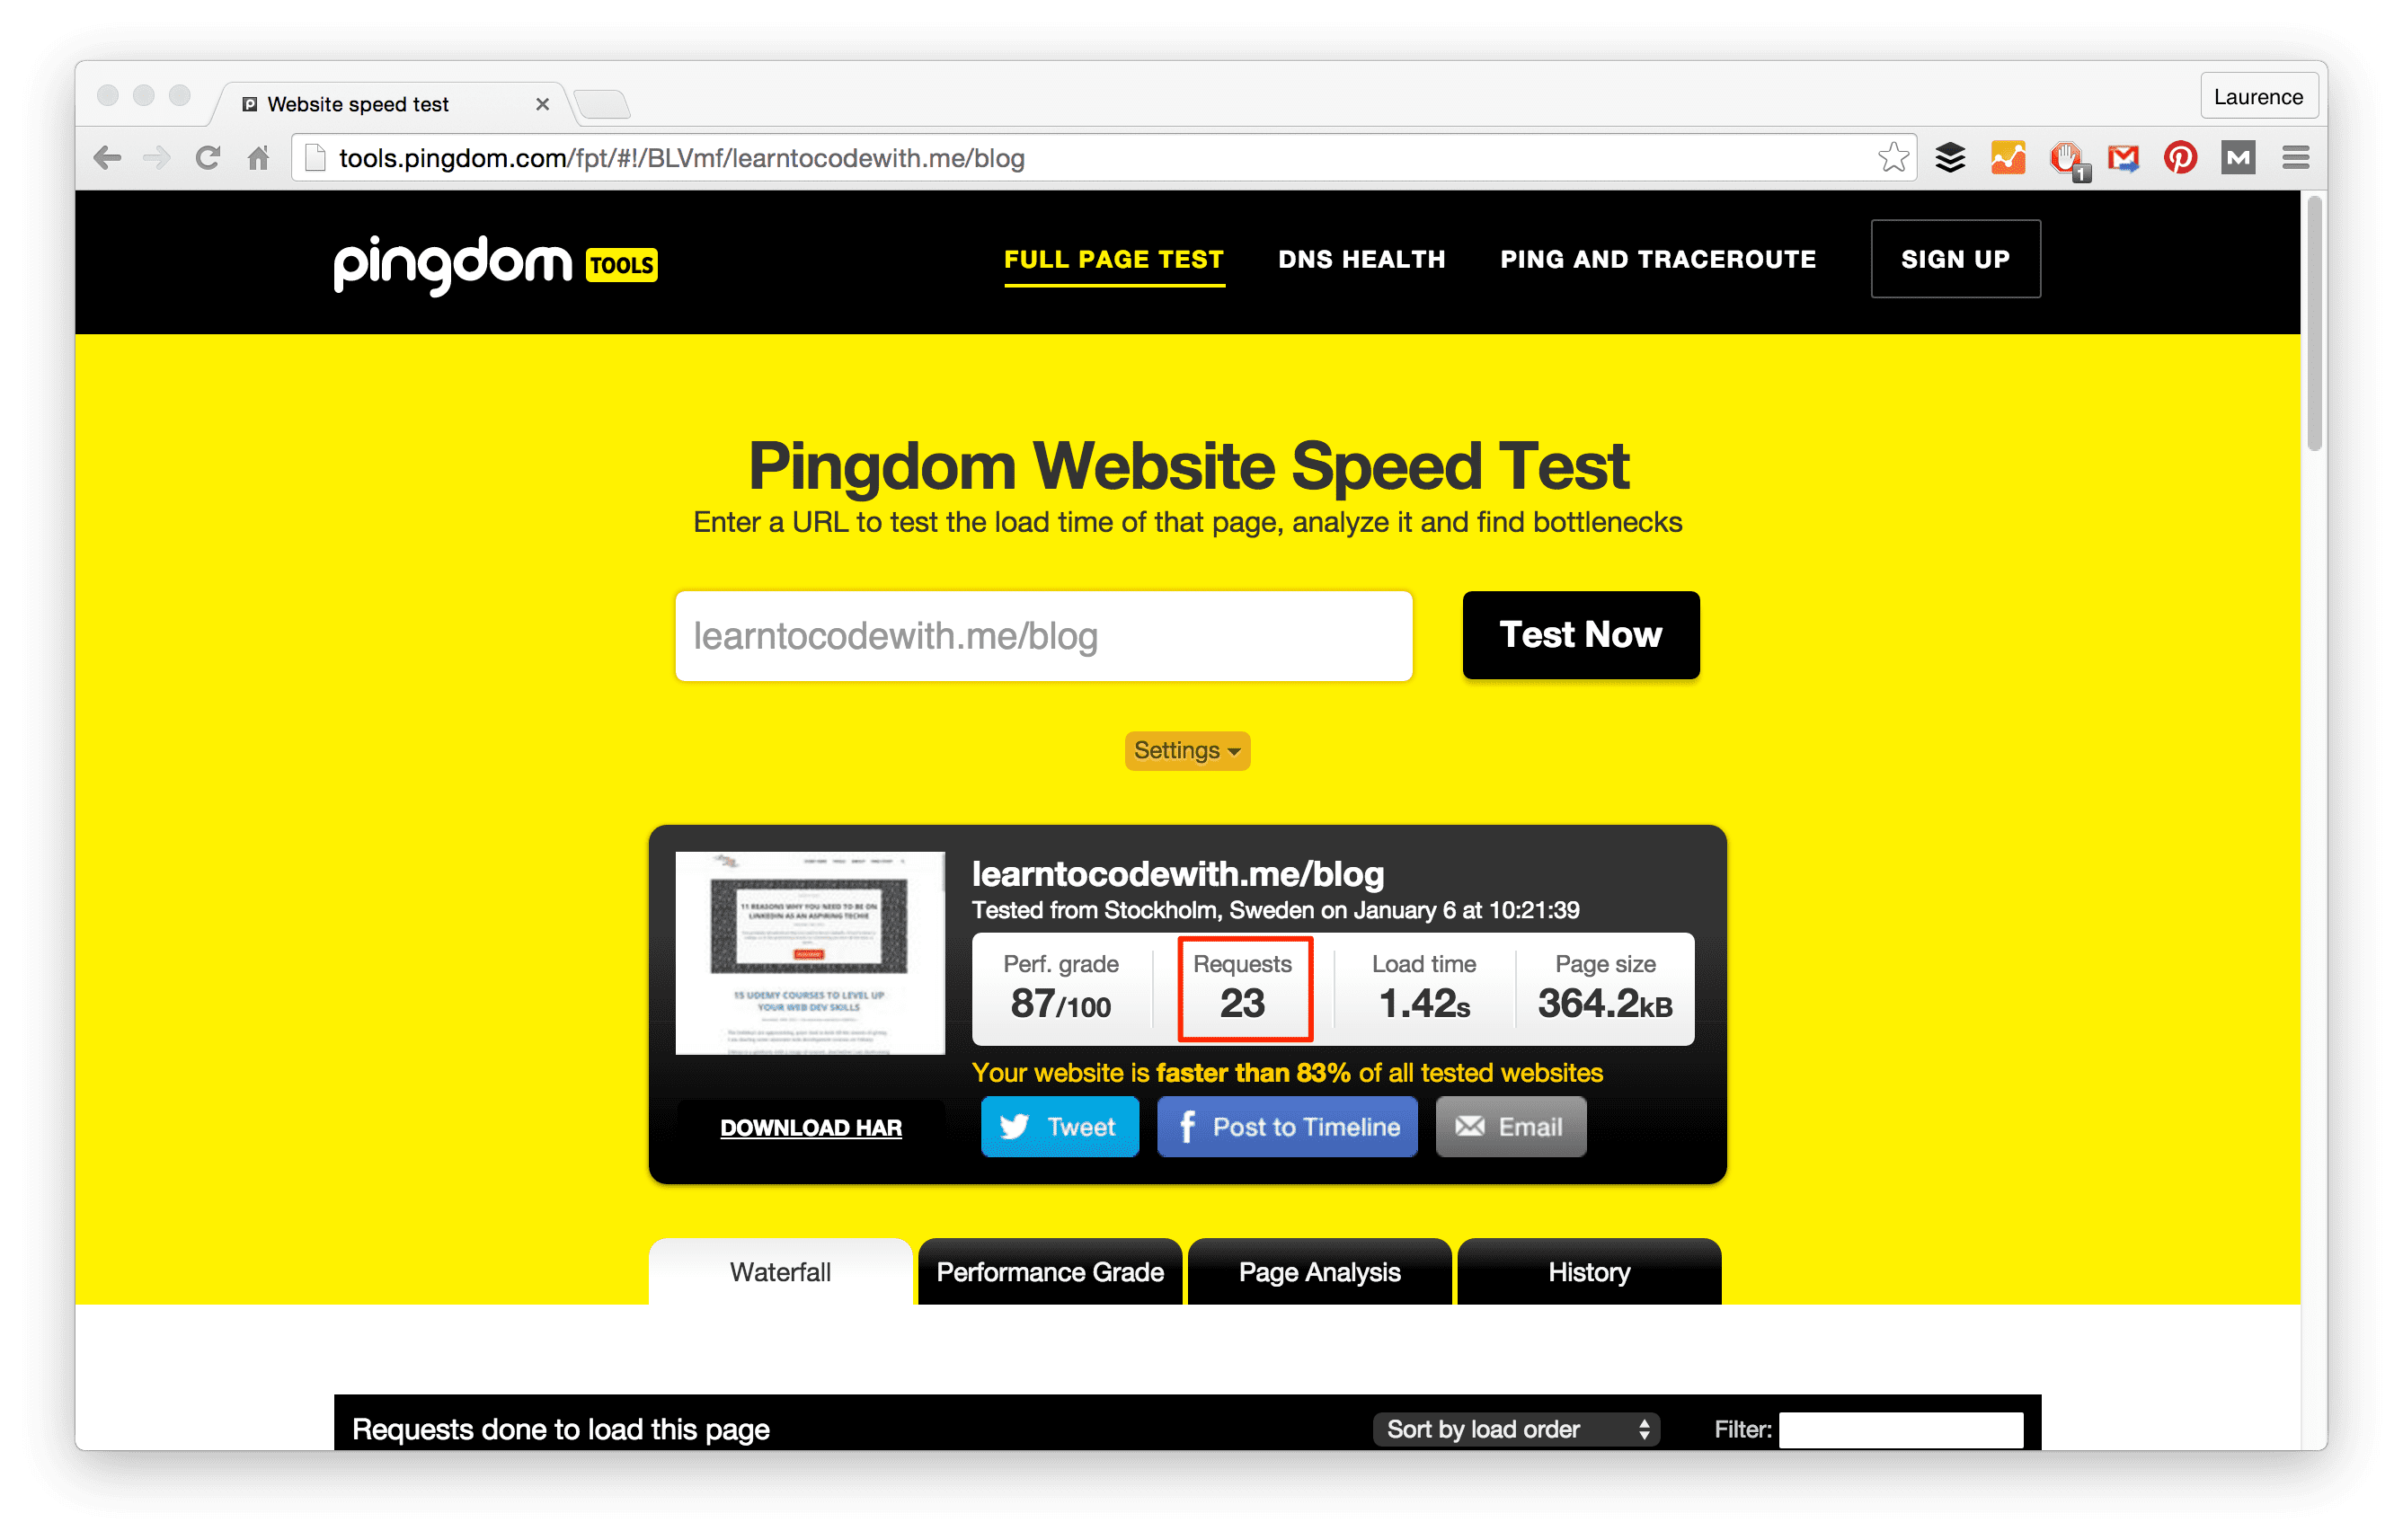
You can see that the learntocodewith.me/blog make 23 requests.
With Pingdom, you can sort the requests by file size and load time. This allows you to see the biggest culprits. The image below was taken on my learntocodewith.me homepage:
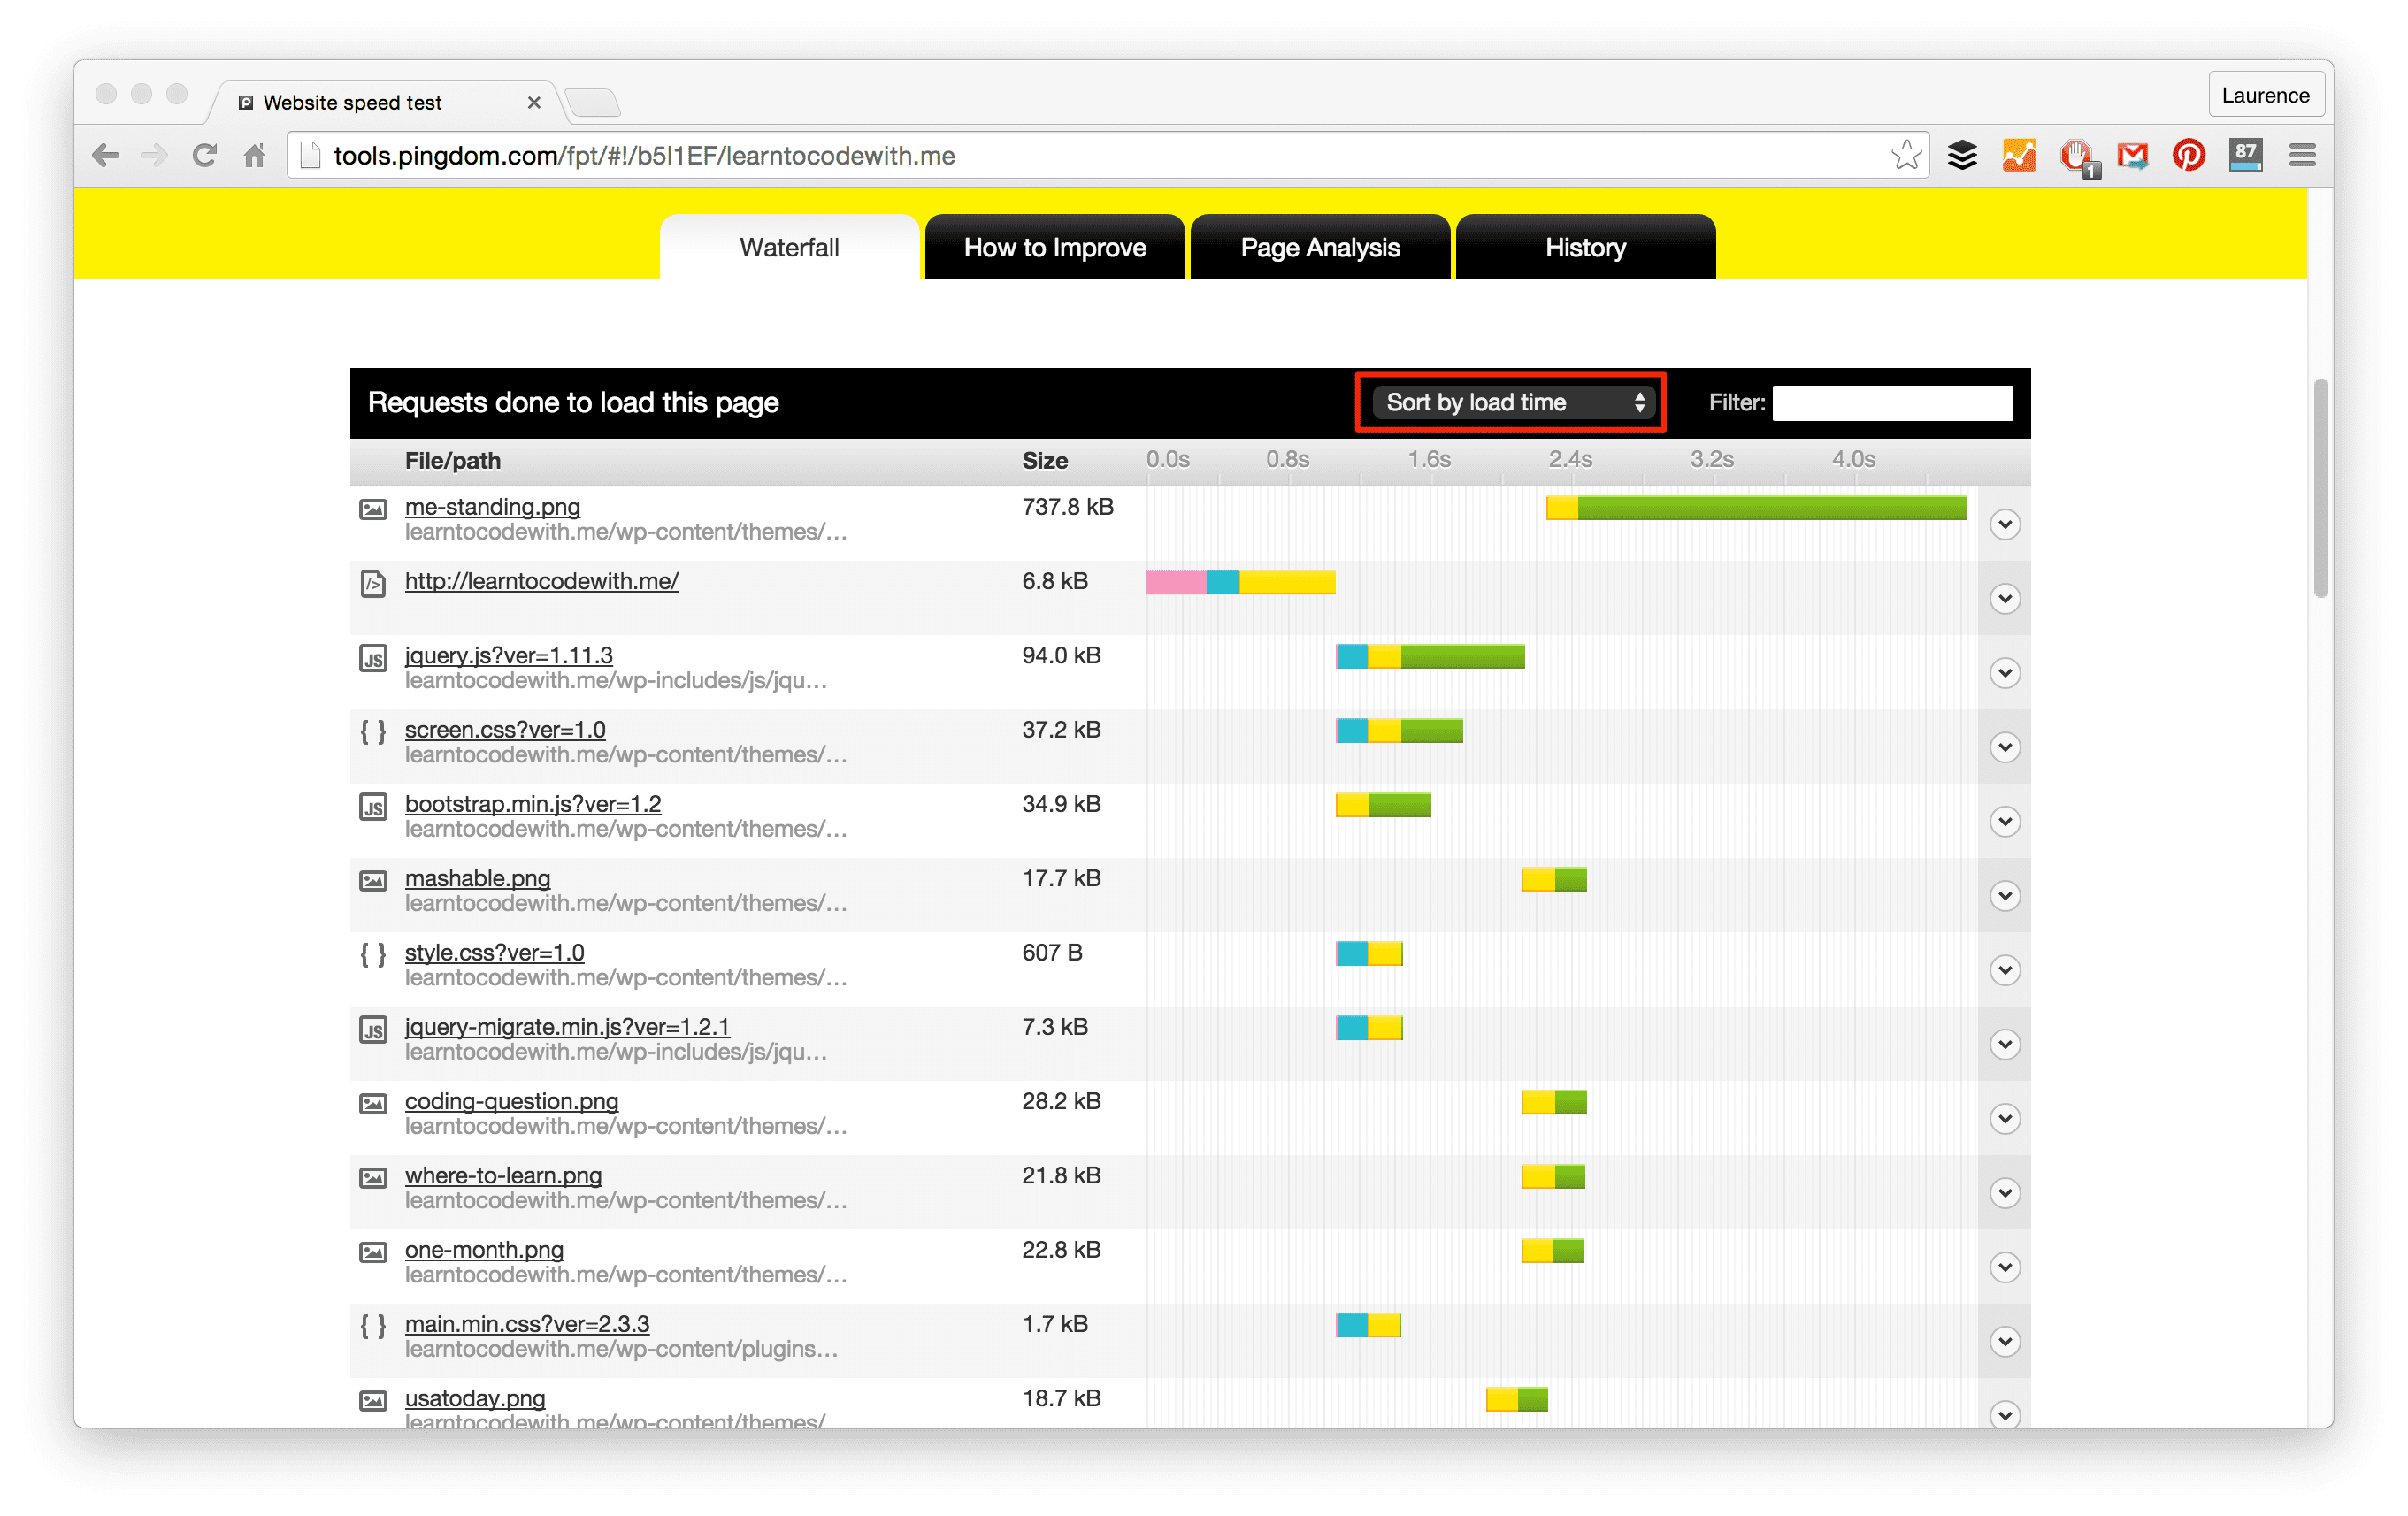
As you can see, the large image of me takes the longest to load.
3. Make images internet-friendly
Site size generally, and image sizes specifically, make a huge difference to your site speed. The larger your content/images, the slower the site.
Some basic ways to counteract this is by shrinking the file sizes of images on your site, reducing the number of images you use, or eliminating them altogether. (This is why I removed featured images on my blog reel last year when I redid the site.)
But having no images on your site is boring! Rather than removing them, optimize images before uploading them to your site by:
- Changing the resolution: reducing the “quality” of the image (and thereby the file size)
- Compressing the picture: increasing the efficiency of image data storage
- Cropping the picture: when cropping, you are cutting out unneeded areas and thus making the image smaller in size
You can make these kinds of changes in a premium tool like Photoshop, or a free program like Gimp. There are even in-browser tools like picresize.com.
For Mac users, there is a free program called ImageOptim, which “optimizes compression parameters, removes junk metadata and unnecessary color profiles.”
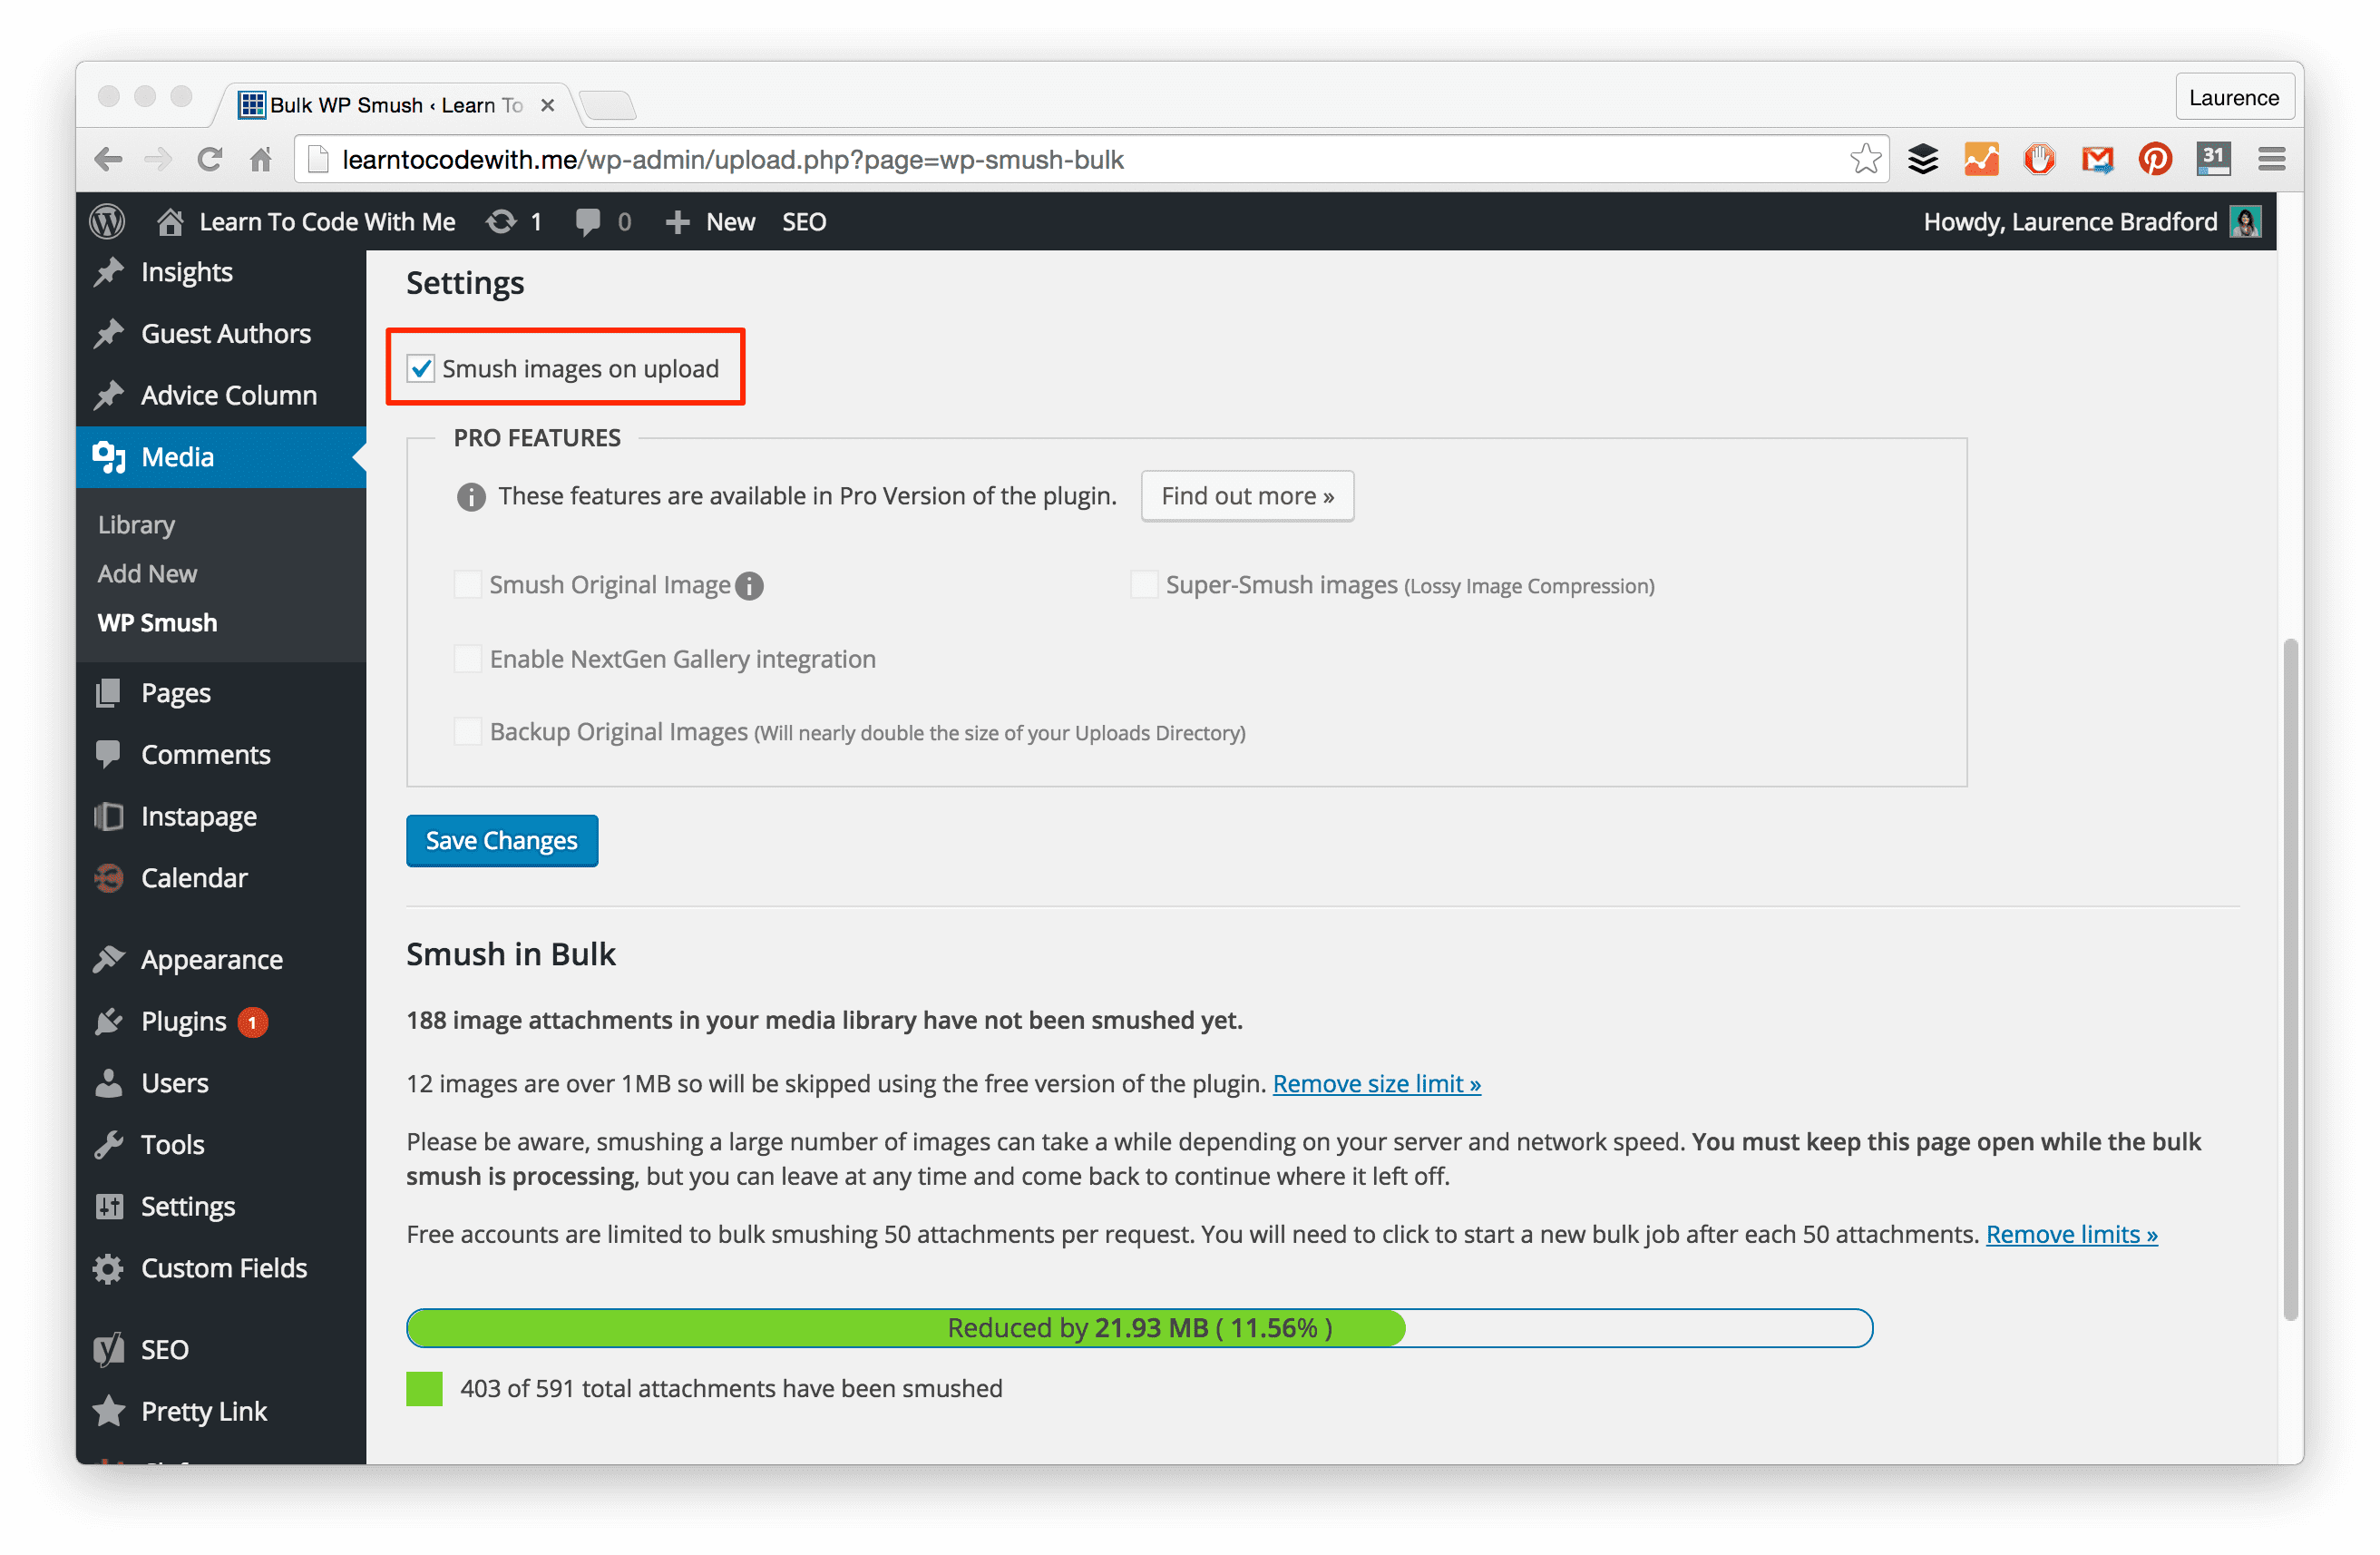
On WordPress, there is a free plugin called Smush, which removes hidden information present in images. Smush scans images as you upload them to WordPress, and prevents unnecessary data from hanging on. It decreases the file size while maintaining the quality of the image.
4. Use plugins sparingly (WP sites only)
Plugin bloat can significantly slow your site performance by creating too many extra files, thus increasing load time.
Try to avoid the use of plugins whenever possible. In my opinion, it’s not possible to avoid plugins entirely. But there are ways you can reduce the overall count.
For starters, if there is an easy way to get around using a plugin – do it. (Example: the Google Analytics plugin. Instead, just add the tracking code to your website footer manually.)
Also, every 4-6 months, set aside time to review your plugins. Evaluate each one and delete it if:
- You don’t use it anymore.
- It’s not doing what it’s supposed to be doing.
- It is “calling deprecated functions”
- There are new and improved plugins that will work better
Aside from taking up space, outdated WordPress plugins are often responsible for security vulnerabilities. (Think about it: it’s a third-party package of code on your site.) Just another reason to keep plugin count low.
5. Cut down on external scripts
You know the snippets of JavaScript code you’ll include to add an extra feature, or library, to your site? These external scripts make HTTP requests every time a new page loads.
Here are some examples of external scripts that could be slowing down your site:
- Facebook “like my page” boxes
- Bootstrap (if brought in via CDN)
- Icon sets like Font Awesome (also when brought in with a CDN)
- External commenting systems (like Disqus)
- Pop-up boxes and similar lead-capture tools (like SumoMe)
- Website analytics services (i.e. Google Analytics or Mixpanel)
- External fonts (i.e. Google Fonts)
This isn’t to say you should avoid these all together (which is difficult to do anyway). Just be aware of this.
To figure out which scripts are especially large, you can turn back to Pingdom to see which files are taking the longest to load.
6. Optimize JS and CSS files
There are two ways you can do this: minification and gzipping (or compression). According to CSS genius Chris Coyier:
“Minification does things like removing whitespace, removing comments, removing non-required semicolons, reducing hex code lengths…”
Gzipping, meanwhile:
“finds all repetitive strings and replaces them with pointers to the first instance of that string.”
For best results, you want to use minifying and gzipping together.
However, gzipping is done at the server level: you must configure it to do it. Chris Coyier talks about it here.
To get started, here are some minifying tools:
- (WordPress Plugin) BWP Minify: allows you to combine and minify your CSS and JavaScript files
- (WordPress Plugin) W3 Total Cache: This is one of the most popular performance plugins. In fact, I use it on Learn to Code With Me. It offers a suite of performance tools – including the ability to minify files.
- WillPeavy: Free HTML, CSS, or JS minifier
Note: if you are using a workflow tool like Grunt or Gulp, you can add NPM packages to minify your files.
7. Take advantage of caching
Page caching is when web pages store static files (like HTML documents and images), which allow visitors to access that page more quickly, since the database does not have to retrieve each file every time there is a request.
The thing with caching, though, is that in most cases it only works for repeat visitors. First-time site visitors won’t have the site cached yet, since the page needs to load files at least once before it stores them.
If you’re a WordPress user, you can install a plugin to enable caching. Here are some popular caching plugins:
- W3 Total Cache: most popular performance plugin (the one I use on learntocodewith.me)
- WP Super Cache: suggested for high-traffic sites with underpowered servers, seems to be updated most often (created by Automattic)
If you’re not using WordPress, you can configure your site to cache at the server level. Digital Ocean has a handful of helpful caching tutorials.
8. Eliminate website baggage
“Baggage” can be many things—many of which have already been discussed (images, plugins, and external scripts).
Some other common examples of website baggage:
- Code that accumulates on your website (like when you go in to make quick fixes, without considering the most productive way to implement the changes)
- Databases that have become massive—this can particularly be the case with e-commerce sites with many orders
- Too many backups done at the server level
- For WordPress users – excessive plugins, themes, saved post and page revisions, and massive media libraries
The main way to clean up extra “baggage” is to go in every so often and do a manual overhaul.
Here are some additional pro-tips:
- Remove spam comments or trackbacks that you don’t need.
- Store media files like PDF downloads externally on Amazon S3 (which is what I do)
- For WP users: remove older installations of WordPress on your server.
- For WP users: use a plugin like WP-Optimize which allows you to clean up your database more efficiently
9. Use a content delivery network (CDN)
I saved CDNs for last because this is more “advanced,” especially for a newbie.
A CDN is essentially many optimized servers around the world that deliver web content to users based on their geographic location. This means big performance improvements for site users. Because, say, if a person accessing your site in India, they will be retrieving web content from a server nearby, rather than across the world in Utah.
Here’s what you can store on a CDN:
- JS files
- CSS files
- Images
- Other uploaded files (like videos, PDFs)
Some common CDNs include:
If you’re on a WordPress site, and already are using the popular W3 Total Cache plugin, here is some good news: it integrates with MaxCDN, so you can get running on a CDN in basically no time. (In other situations, it may not be so simple to move your site assets over to a CDN.)
However, here’s a downside to CDNs: they can get pricey. Especially if you are using a lot of bandwidth.
But for larger sites, with lots of visitors coming from all around the world, a CDN is basically a necessity. And all “big” sites use one without a doubt.
However, if you’re just starting a blog, or building a mini-app, a CDN is not necessary. (Heck, I don’t even use one for my site…yet.)
Here’s what you can do next
You’ve just read my nine tips for speeding up your website. Now it’s time to put these tips into action. Here’s how you can easily get started in just 5 minutes:
- If using a WordPress site, delete unused plugins and themes
- If using any site, remove any unnecessary external scripts (i.e. Facebook like box, SumoMe, Hello Bar, Font Awesome, AB testing tools like Optimizely, etc.)
Since it’s likely that these will only make a small difference, set aside a time to go in deeper and see how much of the other advice you can apply to your own site.
Want to learn how you can boost your website loading speed even more? Check out this course on Skillshare (and take advantage of their free 14-day trial!).
Note: there are affiliate links in this post.